Panko Shrimp – So Crispy! (VIDEO)
This post may contain affiliate links. Please read our disclosure policy.
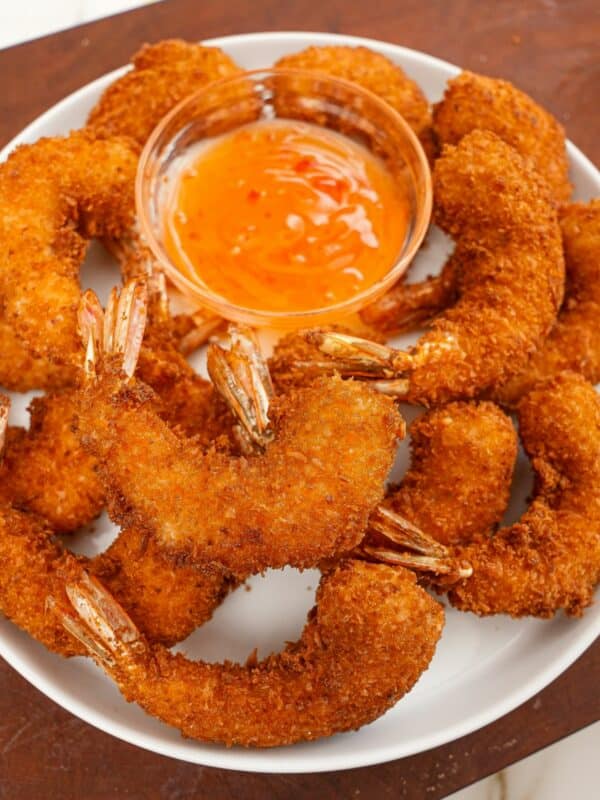
Panko Shrimp are the perfect appetizer or even main dish – the shrimp are super crispy on the outside, juicy and tender on the inside, and pair perfectly with homemade Thai Sweet Chili Sauce or Spicy Mayo!

Watch the Panko Shrimp Recipe Video!
A Note from CJ

Panko Shrimp are so good!
I love how the shrimp is seasoned and juicy on the inside, but super crispy (without being oily or heavy) on the outside! The secret is panko breadcrumbs – they’re my favorite ingredient to use when frying!
I use it in recipes like Chicken Katsu, Pork Katsu, Air Fryer Chicken Katsu, Chicken Katsu Curry, Chicken Katsu Sliders, Air Fryer Chicken Tenders, Air Fryer Fried Fish, Baked Mac and Cheese (as the topping) and Fried Shrimp Sliders!
Ingredient Tips
Refer to the recipe card for the full list of ingredients and measurements!
- shrimp (deveined with tail on) – use the largest raw, deveined shrimp you can find (I used U12 and they were perfect; U16 would work great too!) Leave the tails on for easier eating! If using frozen shrimp, make sure they are completely thawed before seasoning.
- panko breadcrumbs – Panko breadcrumbs are lighter and flakier than regular breadcrumbs, which means less oil absorption when fried – resulting in light and crispy Panko Shrimp. This is a KEY ingredient for this recipe and I do not recommend using anything else.
How to Make Panko Shrimp
Cut and Season Shrimp – Cut the shrimp horizontally in small cuts about 2 inches apart across the underside of the shrimp to straighten the shrimp out. Season the shrimp with salt and pepper.
Dredge and Fry Shrimp – Dredge the shrimp in the wet batter (eggs, flour, water, salt, pepper, and garlic powder) then directly into the panko breadcrumbs until well coated. Then fry the shrimp in 350°F oil for 2-3 minutes until deep golden brown and remove to a wire rack to drain the excess oil. Serve with fresh lemon and enjoy!

Key Tip
CJ’s Recipe & Storage Tips
Make sure to pat the shrimp dry as possible before seasoning. This will help the seasonings adhere better.
Rest the shrimp after dredging (for 10-15 minutes) – it will help the wet batter and panko adhere better, so it doesn’t fall off during frying.
Use a thermometer to monitor the temperature of the oil closely – if it drops below 300F, the shrimp will absorb too much of the oil and turn soggy/oily. Make sure the oil stays between 325-350; otherwise, remove the shrimp and fry in smaller batches.
Storage – Store any leftover Panko Shrimp in an airtight container in the refrigerator for up to 3-4 days. Panko Shrimp tests best fresh – I don’t recommend making them ahead of time. They will soften as they sit in the refrigerator. Reheat in the air fryer at 375 for 5-7 or until warmed through to restore crispiness, or reheat until warmed through in the microwave.
If you tried this Panko Shrimp or any other recipe on my website, please leave a 🌟 star rating and let me know how it went in the comments below!
Panko Shrimp (VIDEO)

Video
Ingredients
Shrimp
- 1 lb shrimp, tails on, shelled & deveined
- 1/2 tsp salt
- 1/4 tsp black pepper, or to taste
Batter
- 2 eggs
- 1/2 cup all-purpose flour
- 1/4 cup water
- 1/2 tsp kosher salt
- 1/2 tsp black pepper
- 1 tsp garlic powder
- 2 cups panko breadcrumbs
- 1 quart neutral oil, for frying; I like avocado oil or canola oil
Instructions
- Cut the shrimp horizontally in small cuts about 2 inches apart across the underside of the shrimp to straighten the shrimp out. Season the shrimp with salt and pepper.
- Set up your dredging station: In bowl 1, mix together eggs, flour, water, salt, pepper, and garlic powder until the wet batter is slightly looser than pancake batter. In bowl 2, set aside panko breadcrumbs.
- Dip shrimp in the wet batter (bowl 1) and let any excess batter drip off.
- Dredge shrimp in panko breadcrumbs (bowl 2). Coat the shrimp completely with the panko, using your hands to press the panko into the shrimp so it sticks. Repeat until all the shrimp are coated. Let the shrimp rest on a tray or rack while you heat up your oil.
- In a large wok or heavy bottomed pot, heat the oil to 350F. Fry for 2-3 minutes until deep golden brown and remove to a wire rack to drain the excess oil. Serve with optional fresh lemon and enjoy!
Notes
- shrimp (deveined with tail on) – use the largest raw, deveined shrimp you can find (I used U12 and they were perfect; U16 would work great too!) Leave the tails on for easier eating! If using frozen shrimp, make sure they are completely thawed before seasoning.
- panko breadcrumbs – Panko breadcrumbs are lighter and flakier than regular breadcrumbs, which means less oil absorption when fried – resulting in light and crispy Panko Shrimp. This is a KEY ingredient for this recipe and I do not recommend using anything else.
Nutrition
Nutrition information is automatically calculated, so should only be used as an approximation.
This crispy Panko Shrimp recipe was originally published in May 2023, and updated in December 2025.


Excellent recipe. I doubled the garlic.
I’m so happy to hear you loved it!
I like the recipe for the shrimp with panko breadcrumbs thanks.