Crispy Coconut Shrimp in 30 Minutes! (VIDEO)
This post may contain affiliate links. Please read our disclosure policy.
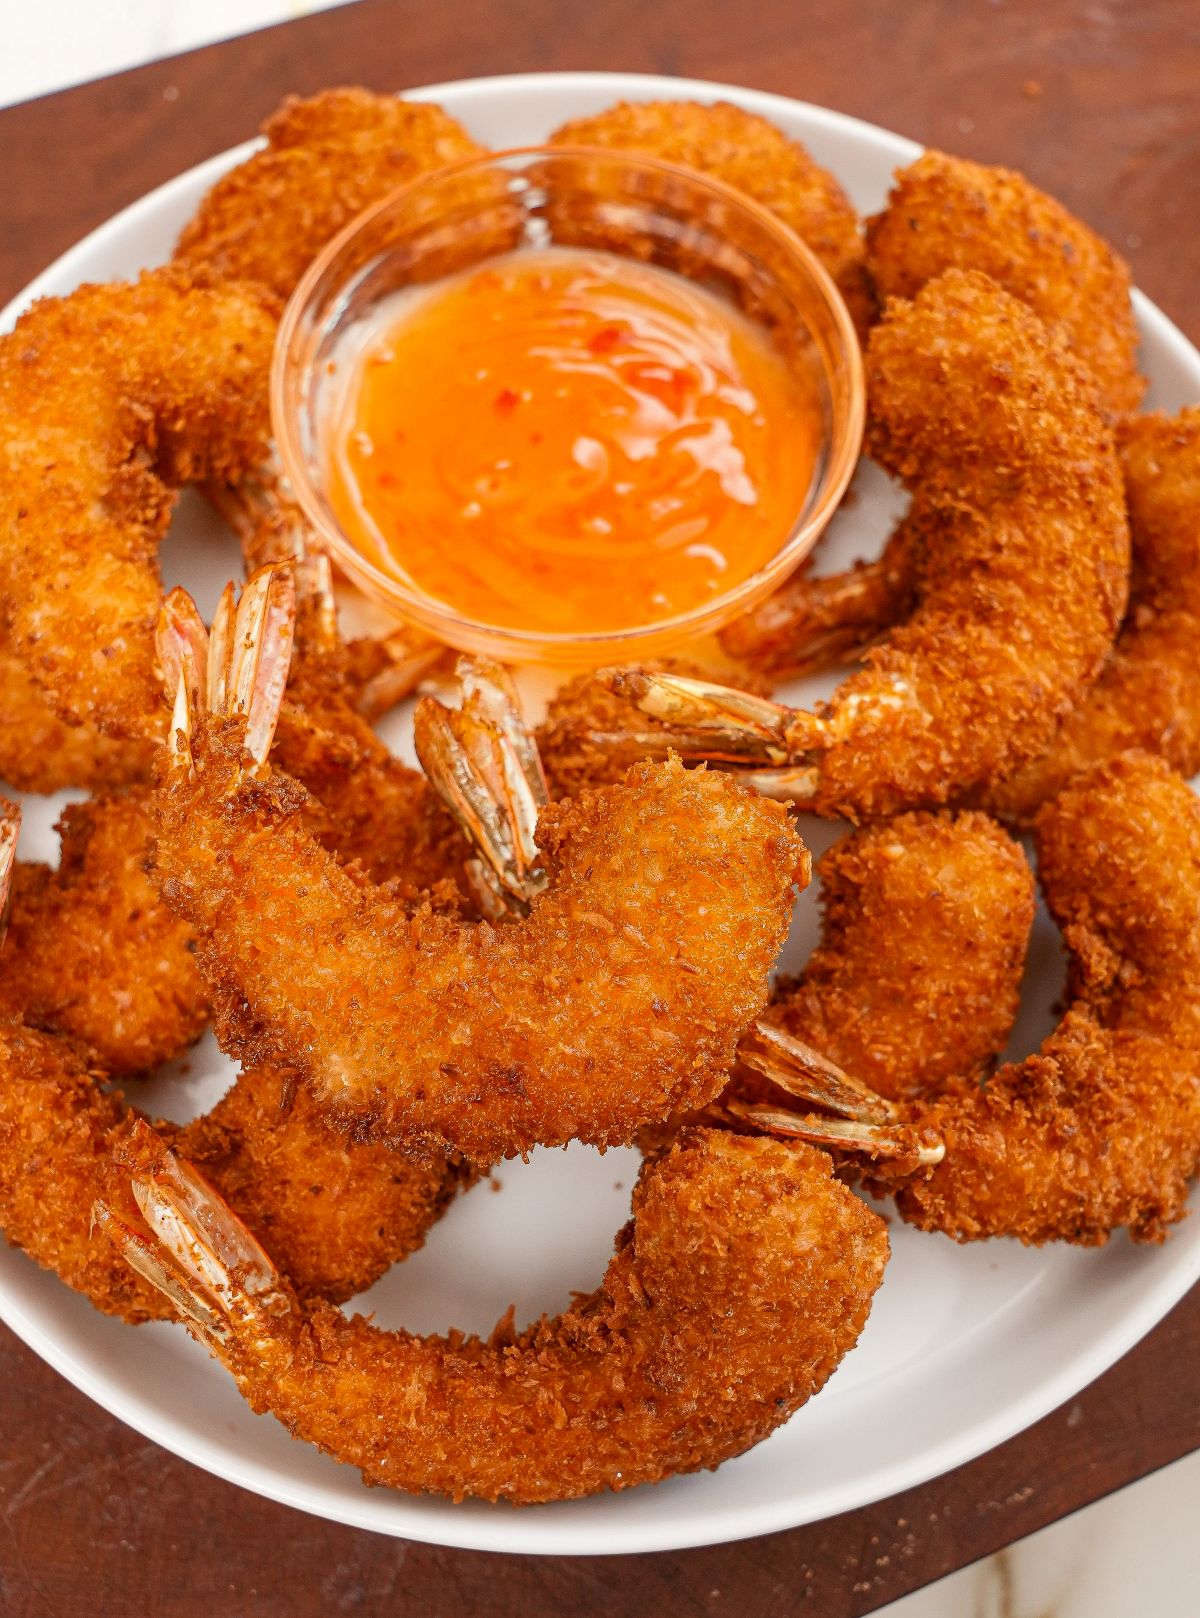
Golden, sweet, and oh-so-crispy – Coconut Shrimp is one of my favorite ways to eat shrimp and this recipe is a crowd favorite!
Watch the Coconut Shrimp Recipe Video!
A Note from CJ
Coconut Shrimp – Island Style!

I was inspired to recreate this after I had the best Coconut Shrimp of my life at the famous Coconut’s Fish Cafe in Maui! I love serving it with homemade Thai sweet chili sauce!
For more island inspired recipes, try Hawaiian Macaroni Salad, Chicken Katsu (with Homemade Tonkatsu Sauce or Mochiko Chicken!
Oh my goodness, the tastiest, crunchiest, easiest coconut shrimp ever. Paired it with CJ’s Hawaiian Macaroni Salad (also mind-blowing) – ten outta ten recipe. Thank you!!
Ingredient Tips
Refer to the recipe card for the full list of ingredients and measurements!
- panko breadcrumbs – Panko breadcrumbs are larger and lighter than traditional breadcrumbs. Using panko breadcrumbs for Coconut Shrimp will result in a crispier, lighter crunch than traditional breading.
- shredded coconut (coconut flakes) – I like to use sweetened coconut flakes so the Coconut Shrimp have a mild sweetness – if you prefer less sweetness, use the unsweetened type. If you can only find the unsweetened version, you can also add 1/2 tsp granulated white sugar to your dry breading mixture. Don’t have shredded coconut? Try making Panko Shrimp instead!
- shrimp – I recommend buying the largest raw shrimp that is peeled and deveined (but keep the tails on) – you may find that the breading can be overpowering if you use too small shrimp. I recommend at least U16 but U12 is ideal (that’s what I used in the photos).
How to Make Coconut Shrimp
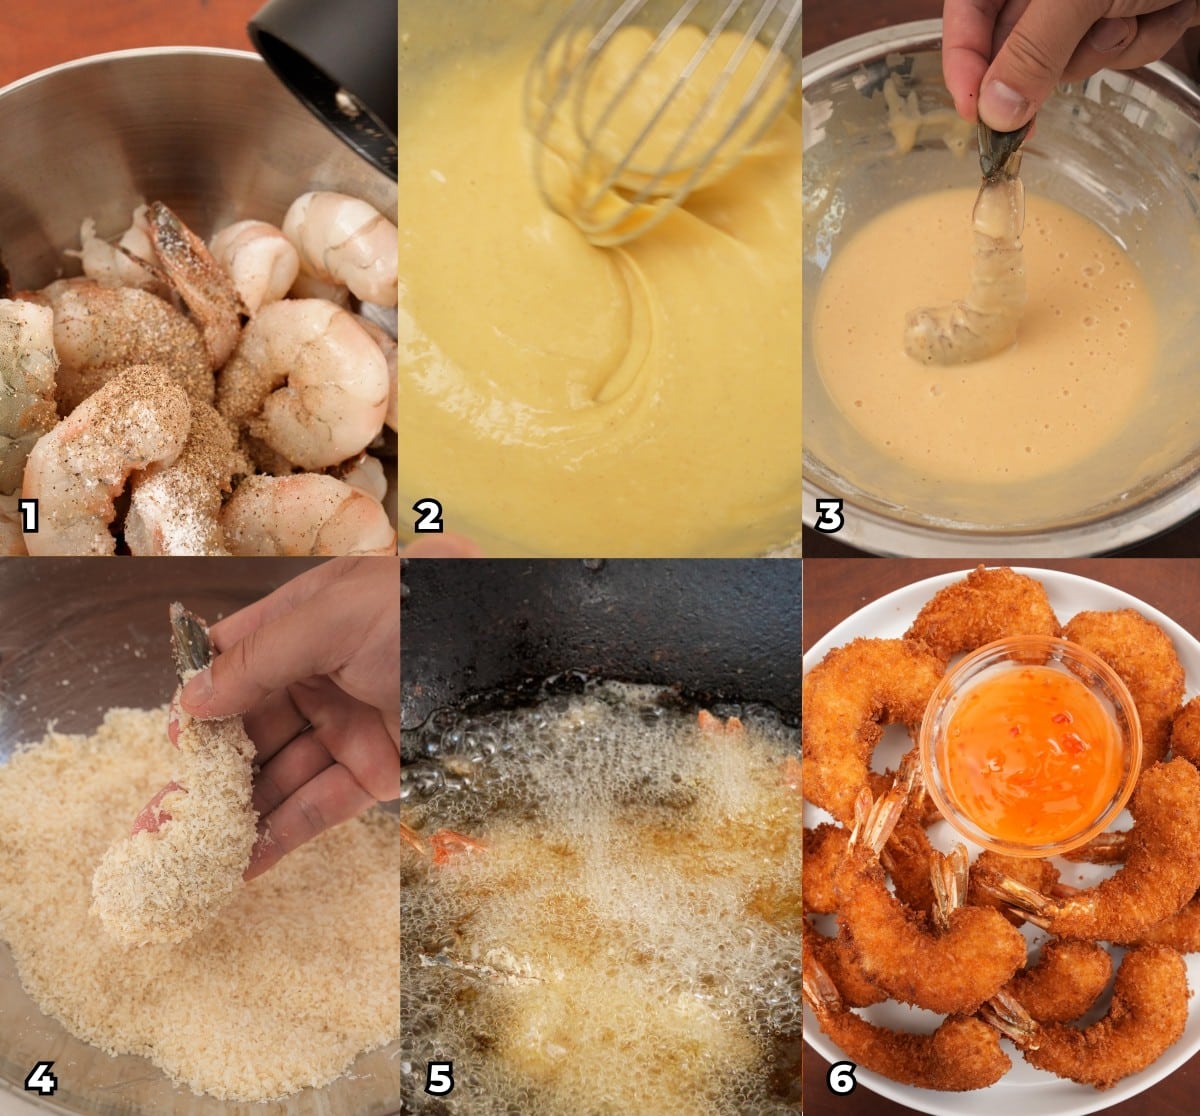
Season Shrimp and Mix Dredge and Batter – Shell and devein the shrimp, leaving the tail on if desired. Pat the shrimp dry with paper towel. Add the shrimp to a bowl and season with salt and pepper. In a bowl or tray, combine panko breadcrumbs and shredded coconut. In another bowl, combine eggs, flour, water, kosher salt, pepper, and garlic powder. Mix until the batter becomes a consistency slightly looser than pancake batter. If the batter is too thick, add water 1 tablespoon at a time to adjust the consistency. If too thin, add more flour until the loose pancake batter consistency is achieved.
Dredge Shrimp and Fry – Dip each shrimp in the wet batter, letting any excess drip off. Then dredge the shrimp in the panko/coconut mixture and coat the shrimp thoroughly using your hands to stick the dredge into the shrimp. Let the shrimp rest on a tray while you heat up the oil. In a large dutch oven or heavy bottomed pan, heat neutral oil to 350F and fry the shrimp in batches for 2-3 minutes until golden brown. Serve with your favorite sauce and enjoy!
PRO TIPS
CJ’s Storage & Reheating Tips
Store any leftover cooked Coconut Shrimp in an airtight container in the refrigerator for up to 3-4 days.
When you are ready to reheat, I recommend using either the oven or an air fryer to help crisp up the shrimp – arrange in a single layer and bake or air fry at 400F degrees for 8-10 minutes. Depending on your oven or air fryer, keep an eye to ensure the shrimp do not burn.
If you don’t care about restoring any crispiness, you can reheat in the microwave until warmed through.
If you tried this Coconut Shrimp or any other recipe on my website, please leave a 🌟 star rating and let me know how it went in the comments below!
Coconut Shrimp (VIDEO)

Video
Equipment
Ingredients
Shrimp
- 1 lb shrimp, use the biggest shrimp you can (I prefer U12-16)
- 1/2 tsp kosher salt
- 1/4 tsp black pepper
Dredge
- 3/4 cup panko breadcrumbs
- 1 cup shredded coconut, if using unsweetened shredded coconut, add 1/2 tsp sugar
Wet Batter
- 2 large eggs
- 1/2 cup all-purpose flour
- 1/4 cup water
- 1/2 tsp kosher salt
- 1/2 tsp black pepper
- 1 tsp garlic powder
- 2 quarts neutral oil for frying, I prefer avocado oil
Instructions
- Shell and devein the shrimp, leaving the tail on if desired. Pat the shrimp dry with paper towel. Add the shrimp to a bowl and season with salt and pepper.
- In a bowl or tray, combine panko breadcrumbs and shredded coconut. In another bowl, combine eggs, flour, water, kosher salt, pepper, and garlic powder. Mix until the batter becomes a consistency slightly looser than pancake batter. If the batter is too thick, add water 1 tablespoon at a time to adjust the consistency. If too thin, add more flour until the loose pancake batter consistency is achieved.
- Dip each shrimp in the wet batter, letting any excess drip off. Then dredge the shrimp in the panko/coconut mixture and coat the shrimp thoroughly using your hands to stick the dredge into the shrimp. Let the shrimp rest on a tray while you heat up the oil.
- In a large dutch oven or heavy bottomed pan, heat neutral oil to 350F and fry the shrimp in batches for 2-3 minutes until golden brown. Serve with your favorite sauce and enjoy!
Notes
- panko breadcrumbs – Panko breadcrumbs are larger and lighter than traditional breadcrumbs. Using panko breadcrumbs for Coconut Shrimp will result in a crispier, lighter crunch than traditional breading.
- shredded coconut (coconut flakes) – I like to use sweetened coconut flakes so the Coconut Shrimp have a mild sweetness – if you prefer less sweetness, use the unsweetened type. If you can only find the unsweetened version, you can also add 1/2 tsp granulated white sugar to your dry breading mixture. Don’t have shredded coconut?
- shrimp – I recommend buying the largest raw shrimp that is peeled and deveined (but keep the tails on) – you may find that the breading can be overpowering if you use too small shrimp. I recommend at least U16 but U12 is ideal (that’s what I used in the photos).
Nutrition
Nutrition information is automatically calculated, so should only be used as an approximation.
This Coconut Shrimp recipe was originally published in March 2023, and updated in March 2026.


Words = Directions Pictures/Photos = Results Videos = Teacher
CJ –
What I saw and read is exactly what I want. But I failed to find any video I need.
Did I miss something?
rf
Hi Ray – the video is just below the first photo. It may take a few seconds to load. Hope that helps!
Amazing!! Thank you CJ
Appreciate you, Deanna!
Really want to try this!
Oh my goodness, the tastiest, crunchiest, easiest coconut shrimp ever. Paired it with CJ’s Hawaiian macaroni salad (also mind-blowing) and blistered shishito peppers (recipe c/o WGC). Threw together a sauce with equal parts sweet chili sauce and apricot preserve. Ten outta ten recipe. Thank you!!
Thank you SO MUCH Stephanie! I’m so glad you loved it 🙂 please consider rating the recipe 5 stars – it really helps out the blog!
I’ve used this recipe so many times and have even shared with family, just the best!
I loved making these for my family on a friday night. We don’t eat meat so this was perfect. simple and delicious just the way I like it!
Made these last night, made as written, Delicious! That crunch *chefs kiss*
Thank you!
I’m so glad you enjoyed them!
Have made a few of you recipes and love them!! My family loves coconut shrimp, will be trying this in a few days. Could you post the recipe for the sauce also?
Thanks for the kind words! This was using store bought sweet thai chili sauce, but I am working on a homemade recipe for it and hope to share soon!