Crispy Fried Chicken Tenders (VIDEO)
This post may contain affiliate links. Please read our disclosure policy.
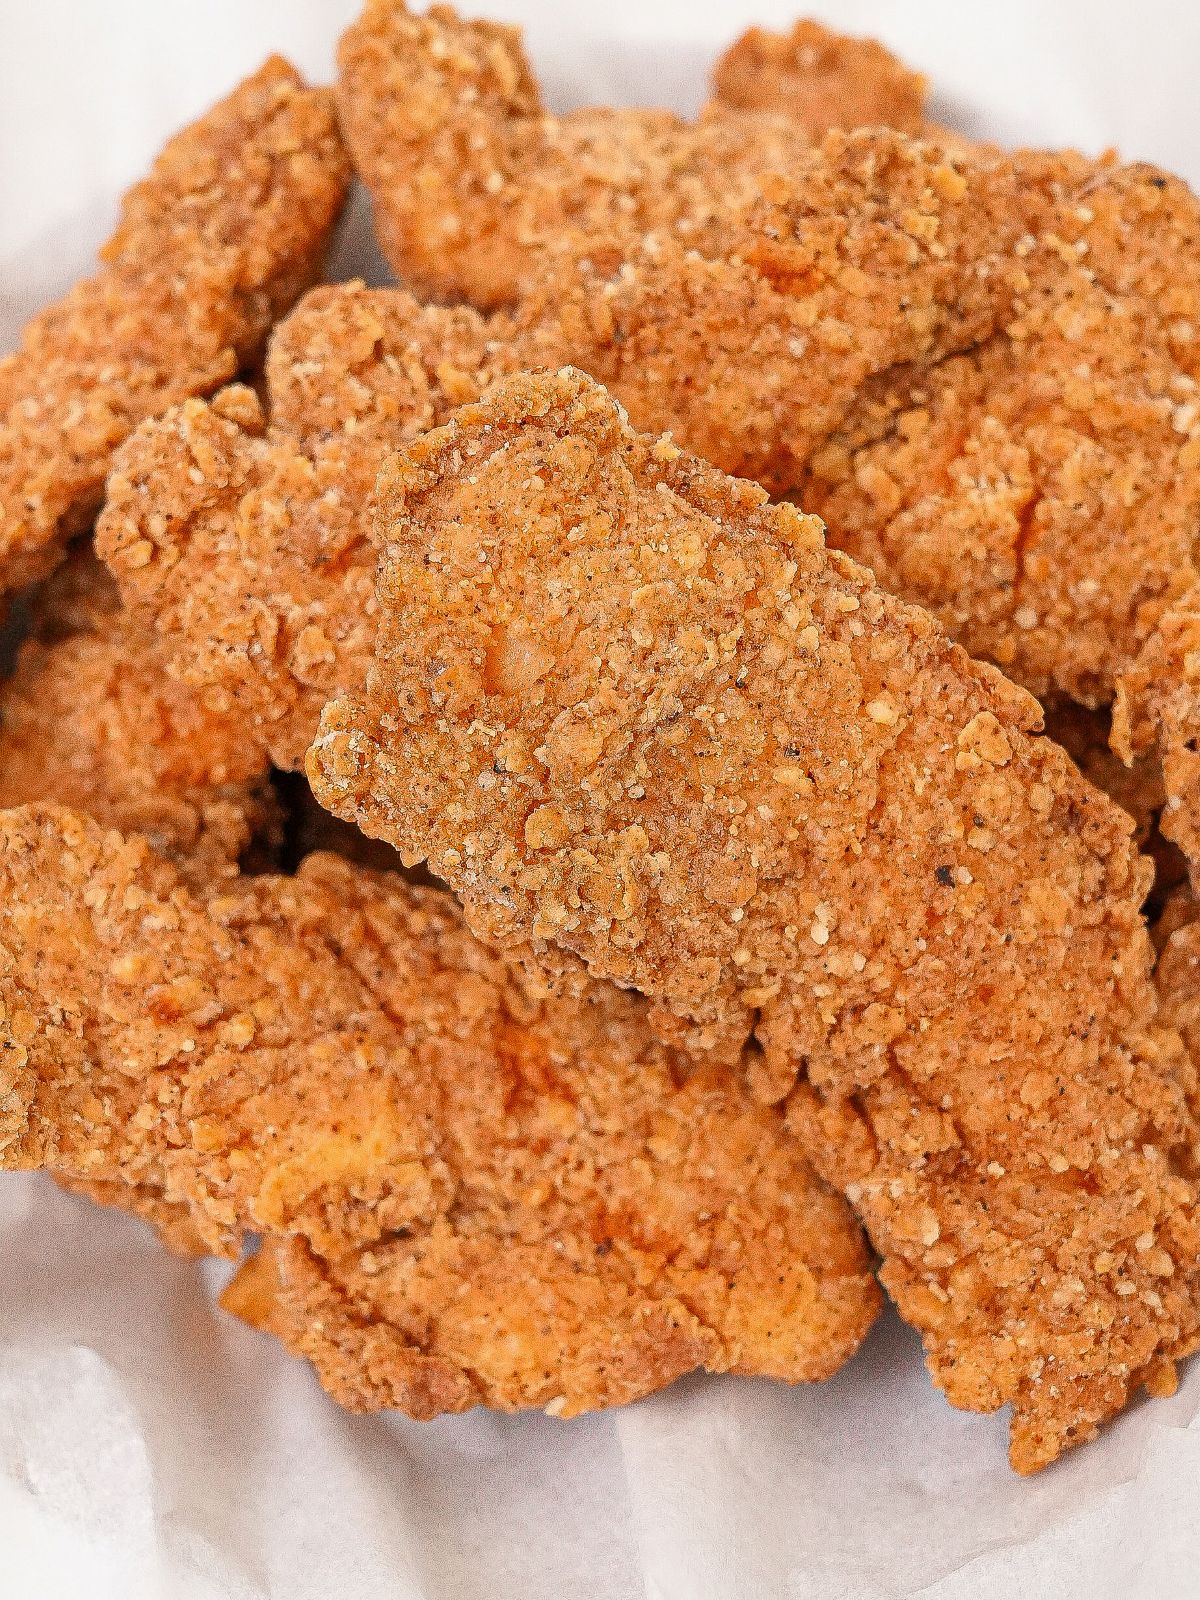
These extra crispy Fried Chicken Tenders are super juicy with a delicious seasoned batter that tastes amazing by itself or dipped into your favorite sauce!
Watch the Chicken Tenders Recipe Video!
A Note from CJ
These are the best Fried Chicken Tenders you’ll make!

As a certified fried chicken lover, trust me when I say these are the best Fried Chicken Tenders you’ll make! The chicken is juicy, the breading is crispy, and has so much flavor – you can eat them plain but I always dip them into my favorite homemade Sauces like Raising Cane’s Sauce, homemade Ranch, Popeye’s Blackened Ranch, copycat Chick-Fil-A Sauce, Honey Mustard, or BBQ Sauce!
If you want to eat fried chicken but avoid deep frying, try my Air Fryer Chicken Tenders, Air Fryer Fried Chicken, or Air Fryer Chicken Wings!
These are by far the BEST chicken tenders I have ever made. Every recipe claims to be “the best” but this one truly lives up to that claim!!!
Ingredient Tips
Refer to the recipe card for the full list of ingredients and measurements!
- chicken tenders – technically, chicken breasts and tenderloins are not the same thing (the tenderloin is a muscle underneath the breast and are more tender) – however, for this recipe, you can also use breasts cut into thin slices.
- all-purpose flour, potato starch, cornstarch, baking powder – I like to do a mix of flour and starches for the perfect balance of crispy, crunchy, and golden brown. Flour is the base of your dredge. Potato starch has a larger granule size, which makes the batter more rigid and brittle. Cornstarch, when mixed with flour, helps prevent gluten development, and baking powder helps creates tiny air bubbles – both things makes the tenders crispier when fried!
- cold water – cold water helps the dredge and batter stick better to the chicken.
- neutral oil – My go-to neutral oil is avocado oil, but you can also use canola or vegetable oil. Avoid using olive oil, which is not recommended for frying due to a lower smoking point.
How to Make Crispy Fried Chicken Tenders
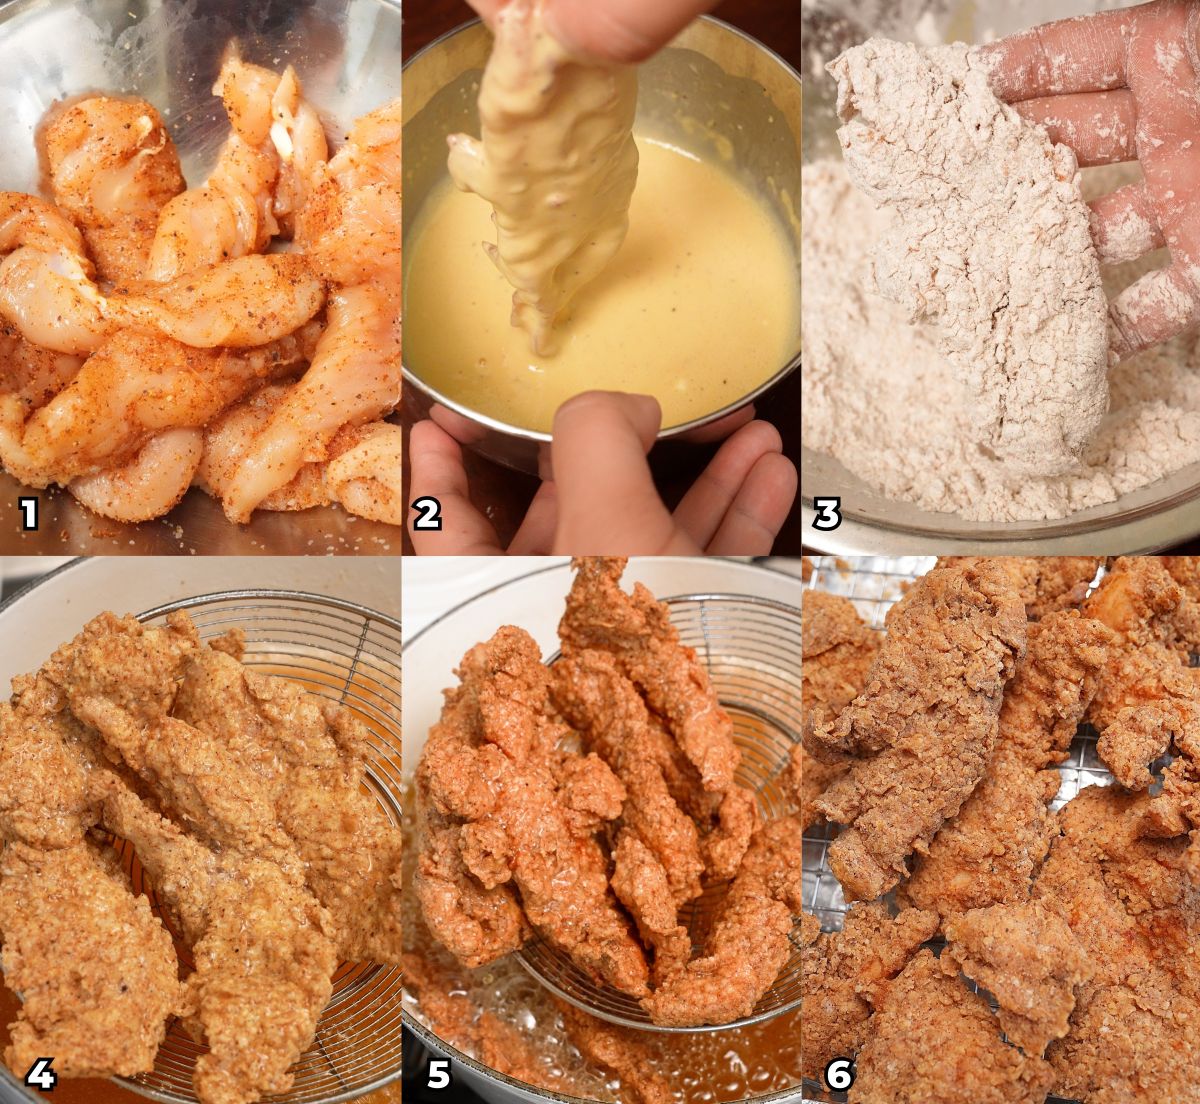
Season the chicken tenders. In a small bowl, combine salt, black pepper, garlic powder, onion powder, paprika, and cayenne pepper, then toss the chicken to evenly coat each piece. Let the chicken sit for 20 minutes to dry brine while you prepare the dredging station. Set up your station with the seasoned chicken, wet batter, seasoned flour dredge, and a lined tray for easy workflow and clean-up.
Dredge and fry the chicken tenders: Next, drizzle a small amount of water into the flour dredge and use your hands to form craggily bits—these create extra crispy texture when fried. Dip each chicken tender into the wet batter, allowing excess to drip off, then coat thoroughly in the seasoned flour, pressing gently to help the dredge stick. Shake off any loose flour and let the chicken rest on the tray while heating oil to 325°F. Fry the chicken tenders in batches for about 4 minutes, drain on a wire rack, then increase the oil temperature to 375°F for a second fry. Fry for an additional 2 minutes until golden and crispy, then transfer to a rack to cool before serving.
PRO TIPS
CJ’s Recipe & Storage Tips
Dredging Tips – For the best dredging, make sure to let any excess wet batter drip off before dredging the chicken in the seasoning flour. Pack in the dredge so the chicken is evenly coated (no bald spots!) Shake off any excess loose breading before placing on the lined tray.
Watch the Oil Temperature! I highly recommend using an infrared thermometer to easily check the temperature of your oil during heating and frying. Monitor the oil temperatures and if they drop below 300°F , remove the chicken tenders and turn the heat up for the oil to reach at least 300°F. I recommend frying the tenders in small batches – for 1.5 lbs of chicken tenders, I fried in two batches. Do not overcrowd your pot and risk oil bubbling over!! Use a heavy bottomed pot or dutch oven, as they retain heat better.
Storage and Reheating – You can store any leftover Chicken Tenders in an airtight container in the refrigerator for 3-4 days. Keep in mind that the Chicken Tenders will not stay crispy once refrigerated. You can reheat Chicken Tenders in the air fryer at 350F for 6-8 minutes until crispy, or on a wire rack in the oven at 375°F for 10 minutes until crispy and warmed through. You can also reheat them quickly in the microwave, if you don’t care about the texture.
If you tried this Chicken Tenders Recipe or any other recipe on my website, please leave a 🌟 star rating and let me know how it went in the comments below!
Crispy Fried Chicken Tenders (VIDEO)

Video
Ingredients
Chicken
- 1.5 lb chicken tenders
- 1 tsp kosher salt
- 1/2 tsp black pepper
- 1/2 tsp garlic powder
- 1/2 tsp onion powder
- ½ tsp paprika
- 1/4 tsp cayenne pepper
Seasoning Dredge
- 3/4 cup all-purpose flour
- ½ cup potato starch
- 1 cup cornstarch
- 1 tbsp kosher salt
- 1 tbsp black pepper
- ½ tbsp garlic powder
- 1/2 tbsp onion powder
- 2 tsp paprika
- 1 tsp cayenne pepper
- 1 tablespoon baking powder
Wet Batter
- 1 cup all-purpose flour
- 2 eggs
- 1 cup cold water
- 1 tsp Kosher salt
- 1/2 tsp black pepper
Oil
- 2 quarts Neutral Oil, for Frying
Instructions
- In a small bowl, mix together salt, black pepper, garlic powder, onion powder, paprika and cayenne pepper. Evenly add the mixed spices to the chicken tenders and toss to fully coat the chicken. Let sit and dry brine for 20 minutes while you move to step 2 and 3.
- In two separate bowls, mix together the seasoning dredge and wet batter and set up a dredging station with the seasoned chicken, wet batter, and seasoning dredge.
- Take a ¼ cup of water and drizzle it into the dry seasoning dredge. Rub the seasoning dredge together with your hands to form craggily bits throughout the mixture.
- Line a baking sheet with foil. Dredge the seasoned chicken tenders in the wet batter, and let any excess drip off. Then add them into the seasoning flour and use your hands to pack the dredge into the chicken. Shake off any excess loose breading and add them to the baking tray.
- In a large heavy bottomed pot or dutch oven, heat neutral oil to 325°F. Fry the chicken tenders in batches at 325°F for 4 minutes (I did 2 batches for 1.5 lbs of chicken), using a thermometer to ensure the oil temperature does not drop below 300°F. Remove the chicken to a wire rack to drain. Repeat until all the chicken tenders are fried.
- Use a mesh skimmer to remove any loose dredge from the oil. Heat the oil to 375°F and fry the chicken tenders a second time for 2 minutes. Remove to the wire rack and let cool. Serve with dipping sauce and enjoy!
Notes
-
- Technically, chicken breasts and tenderloins (commonly called Chicken Tenders) are not the same thing. The tenderloin is a muscle underneath the breast – the butcher will usually cut it off and sell it separately.
-
- Tenderloins are more tender than breasts (hence the name!)
-
- If you can’t find or don’t have Chicken Tenders, you can slice breasts into long strips.
-
- For the best dredging, make sure to let any excess wet batter drip off before dredging the chicken in the seasoning flour.
-
- Pack in the dredge so the chicken is evenly coated (no bald spots!)
-
- Shake off any excess loose breading before placing on the lined tray
Nutrition
Nutrition information is automatically calculated, so should only be used as an approximation.


My husband found this recipe on Instagram and I saved it in the “yeah, sure, I’ll make this folder.” Then he started complaining that we don’t have a good fried chicken recipe. So I made this. Now we have an amazing fried chicken recipe. Thank you.
Thank you so much for the amazing review! I hope this becomes your new go to recipe!
Excellent!
Hi Chris this is by far the very best fried chicken tender recipe ever. The chix tenders cooked beautifully and equally as delightful to eat. Also, your honey mustard sauce really rocks, everyone raved about the entire meal. Thanks for sharing a truly delightful and crowd pleasing recipe.
Thank you so much, John! I really appreciate you taking the time to write a review!
The recipe is simple and yummy
Followed your recipe exactly as written (using cut up breast instead of tenderloin) and they turned out perfect, very flavorful and crispy! I’ve been on the hunt for a good chicken tender recipe and thankfully found it here, thank you for sharing. I look forward to trying more of your recipes!
Thanks so much, Paula!
Delicious! this recipe is gluten free and it felt like I was eating chicken selects from McDonald’s back in the day except without all that nasty chemical ingredients. Great recipe for extra crispy tenders
So great to hear you loved it. Thanks for the great review, Alex!
Tried these today,was a big hit!
I’m so glad you loved them Susanna! Please consider leaving a 5 star review when rating – it really helps the blog out!
These turned out absolutely perfect!
Thank you, Brittany! I’m so happy you loved them!
I made these for a customer and they were devoured. High high praise for you, my man!!
Hi CJ, where is the video link on this page?
It’s under the first photo in the post at the top!
If you mean the first of the Table of Contents links, I’ve tried that link on two different browsers, but it doesn’t go to any video, just stays on the page. All the other links work. Also, the same issue is on all your other listed (VIDEO) recipes.
The video will appear just above the Table of Contents under “Watch the Chicken Tenders Recipe Video Below!” – let me know if you see it there!
So it doesn’t work in Firefox, just goes from the photo of the chicken tender to the Want to save this recipe? box. However, I tried it on Chrome, and it does work there. It also works on Chromebook.
And then… I noticed Firefox has an update, so I installed that, and now the video is there. I looked at the release notes (https://www.mozilla.org/en-US/firefox/136.0/releasenotes/) and this could be due to a new feature called Smartblock Embed,s allowing social media embedded content. I don’t know, whether you fixed anything or it was an outdated Firefox, but thanks, it works now.
Amazing – thanks for letting me know!
Delicious!