Air Fryer Crispy Pork Belly (SUPER CRISPY!) (VIDEO)
This post may contain affiliate links. Please read our disclosure policy.
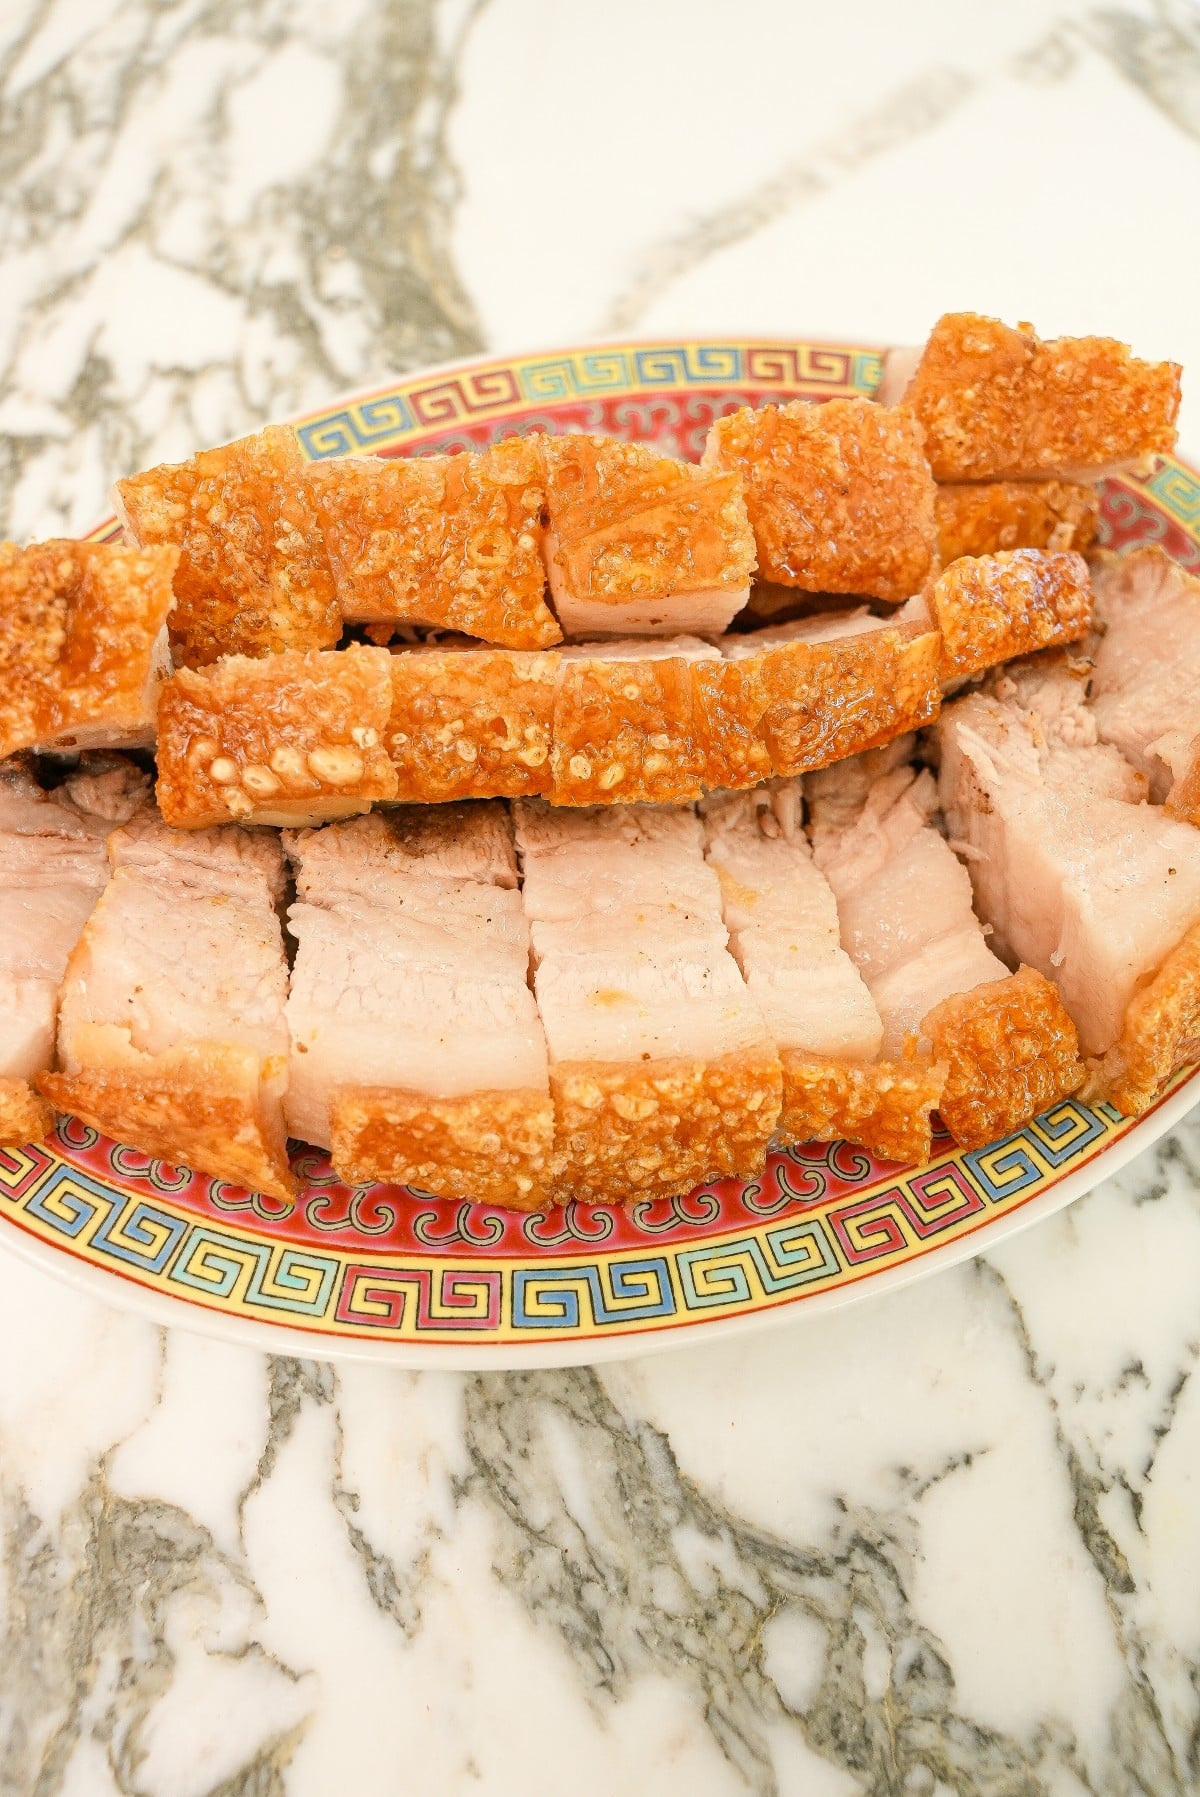
This is the best (and easiest!) way to make Crispy Air Fryer Pork Belly in just one hour! My method and key tips will get you the juiciest Chinese roast pork with the signature crispy, crackling skin – without the 48 hours of prep time!
Watch the Air Fryer Crispy Pork Belly Recipe Video!
A Note from CJ
Make Crispy Pork Belly in the Air Fryer!

If you love Chinese crispy pork belly but need it fast, my recipe for air fryer crispy pork belly is the answer! No need to wait or prepare ahead of time – all it takes it one hour and you’ll have the crispiest, juiciest Chinese roast pork!
Air Fryer Recipes are some of my most popular, like my Air Fryer Chicken Wings, Air Fryer Chicken Tenders, Air Fryer Chicken Thighs, and Air Fryer Chicken Skewers!
I tried your air-fryer pork belly recipe exactly as written, times and temps included. It turned out perfectly! Crispy on the outside, juicy and flavorful inside and so easy to make.
Ingredient Tips
See the recipe card for full information on ingredients and quantities.
- pork belly, skin on – Go to your butcher and ask for a boneless, center cut, skin-on pork belly. (A center cut pork belly will be the most even and symmetrical piece, which should have an even proportion of skin and meat.) Ask for a piece that has a thin layer of white fat in between the meat sections. I have found that this results in the most optimal end proportion of meat to fat.
- kosher salt, white pepper, five spice powder, sugar, Shaoxing wine – this is for the seasoning paste. I do not recommend using any substitutions or omiting any ingredients.
- distilled white vinegar – Distilled white vinegar is a key ingredient! It helps soften the pork belly skin and removes any odors. (I have seen other recipes use baking soda but I prefer the results from white vinegar.)
How to Make Crispy Pork Belly in the Air Fryer
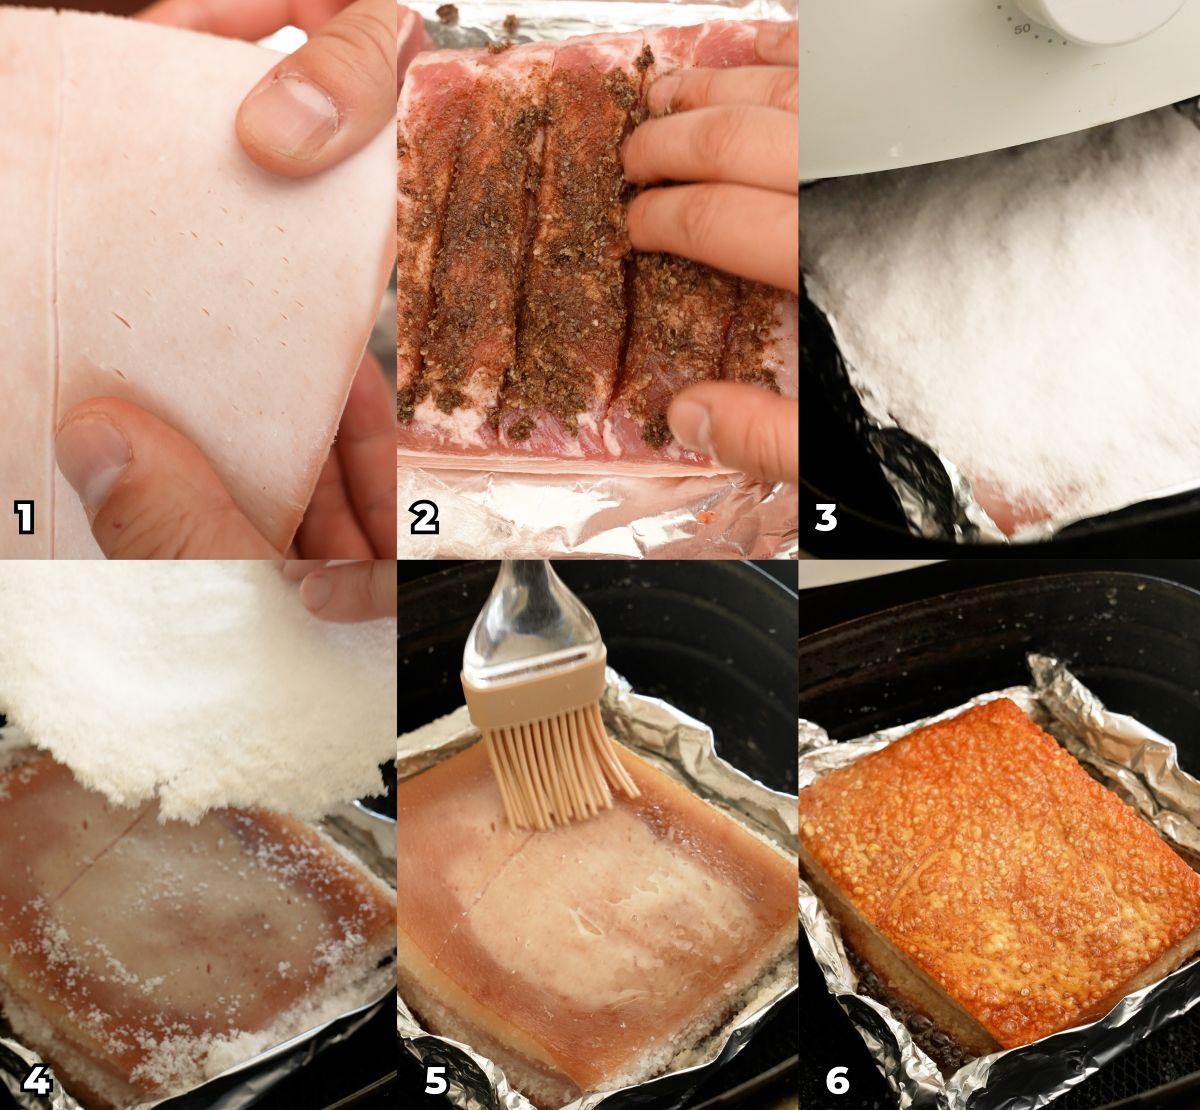
Prepare and season the pork belly: For foolproof, crispy air fryer pork belly, start by slicing the meat side of the pork belly with ½” deep cuts and making a flavorful paste of salt, white pepper, five spice powder, sugar, and Shaoxing wine. Rub the mixture evenly over the meat side, avoiding the skin. Pat the pork belly skin completely dry, then use a sharp knife to poke holes all over the surface, being careful not to pierce through to the meat. Cut the pork belly to fit in your air fryer basket for even cooking.
Air fry the pork belly: Next, create a foil barrier around the pork belly and brush the skin with vinegar before covering it entirely with the kosher salt. Air fry at 250°F for 30 minutes until the salt crust dries, then remove and clean off the excess. Brush the skin lightly with oil and air fry the pork belly again at 400°F for 30–40 minutes until it’s golden, puffed, and the skin is golden brown and crispy. Check frequently to during the air frying process to prevent burning and cover any hot spots with foil. Let the crispy pork belly rest for 5–10 minutes before slicing to enjoy tender meat with a perfectly crunchy crackling.
My Pro Tip
CJ’s Recipe Tips
Preparation tips
- Use a sharp knife or piercing tool to poke holes in the skin only – don’t poke so deep that you pierce the meat! Poking holes into the pork belly skin allows the fat to render out more easily, which will ‘fry’ the skin in the air fryer and help it puff up.
- Moisture is the enemy of crispy pork belly skin, so be thorough when patting dry the skin with paper towels. Make sure it is as dry as possible.
- The salt will help draw moisture out of the pork belly skin, which will also help the skin crisp up. 1 cup of kosher salt may look like too much but trust me – it is the appropriate amount!
Second air fry tips – When air-frying the pork belly for a 2nd time, start checking the skin at the 20 min mark and for every 5 min after that, as cooking time will vary with different air fryers. If you see any of the skin burning, place a small piece of foil over the specific area to cover it and continue air-frying until the rest of the skin has crisped up to your liking.
Rest before slicing – Once the pork belly is done, make sure to let it rest before slicing (at least 5-10 minutes). Resting is a key step in cooking meat any meat, as it allows the meat’s fibers to relax and reabsorb the juices!
If you tried this Air Fryer Crispy Pork Belly or any other recipe on my website, please leave a 🌟 star rating and let me know how it went in the comments below!
Air Fryer Crispy Pork Belly (VIDEO)

Video
Equipment
Ingredients
- 3 pound pork belly, 1.5 kg, skin on
- 1/2 tablespoon kosher salt
- 1/2 tablespoon white pepper, 5 g
- 1/2 tablespoon five spice powder, 5 g
- 1/2 tablespoon sugar, 6 g
- 1/2 tablespoon Shaoxing wine, 7 ml
- 1 cup kosher salt
- 1 tablespoon white vinegar, 15 ml
- 1 tablespoon neutral oil, 15 ml
Instructions
- To the meat side, use a knife to make 1/2" deep cuts lengthwise across the pork belly. In a small bowl, combine salt, white pepper, five spice powder, sugar, and Shaoxing wine to make a paste. Evenly spread the paste on the meat side of the pork and crevices ensuring not to touch the skin.
- Pat the skin-on pork belly dry with a paper towel and poke holes all across the skin of the pork using skewers or sharp knife. Ensure that the holes only puncture the skin and fat (do not pierce all the way through the meat). Cut the slab of pork belly so it will fit in your air fryer.
- Create a tin foil frame around the pork belly, leaving a ½” gap up from the edges of the pork to prevent salt from spilling over. Brush a layer of vinegar on the skin, then cover the skin completely with a layer of salt.
- Air fry at 250F for 30 minutes or until the salt has dried completely.
- Remove the salt from the pork belly and brush off any excess. Pat dry with a paper towel.
- Brush the skin with neutral oil, then air fry at 400F for 30-40 minutes until the skin is puffed and crispy. Check at the 20 minute mark and every 5 minutes to monitor the skin, checking for burning, as the time will vary with different air fryers! If spots of the skin begin to burn, place a small piece of foil over the specific area to cover it and allow the exposed areas to continue crisping up.
Notes
- Use a sharp knife or piercing tool to poke holes in the skin only – don’t poke so deep that you pierce the meat! Poking holes into the pork belly skin allows the fat to render out more easily, which will ‘fry’ the skin in the air fryer and help it puff up.
- Moisture is the enemy of crispy pork belly skin, so be thorough when patting dry the skin with paper towels. Make sure it is as dry as possible.
- The salt will help draw moisture out of the pork belly skin, which will also help the skin crisp up. 1 cup of kosher salt may look like too much but trust me – it is the appropriate amount!
Nutrition
Nutrition information is automatically calculated, so should only be used as an approximation.
This recipe was first published in September 2023, and updated in October 2025.


This was seriously SO GOOD and SO EASY! The flavour was amazing and the pork stayed crispy for so long! Definitely will be making this again in the near future.
Worked like a bomb!, I will eagerly be using the air fryer as apposed a Weber any day!!
Just have to work on scrapping the salt off properly.
So glad you loved it!
I’ve used this recipe multiple times and it always turns out perfectly! Love how easy and quick it is in the air fryer and the spice mix is simple yet so tasty!
Just be sure to remove the salt crust thoroughly so the surrounding meat doesn’t get to salty.
I’m tempted to gatekeep this recipe but my friends have forced me to share it. Thanks CJ!!
Thank you Gi!
amazing recipe! This is my first time making it and it turned out so well! My husband really loves it
Thank you so much Soy! I’m so glad you both loved it!
Nice instruction, very detail
Thank you!
This recipe is a keeper! Can’t wait to try it with a skin-on pork belly. Definitely putting this into the meal planning rotation!
For a make ahead plans what step would you do ahead of time and which steps should be done just before preparing to eat.
Thank you Jolene! To make ahead, you can prep the pork belly and marinate it with the spices. I would suggest doing the remaining steps before preparing to eat to ensure the skin blisters correctly.
Will the end result be as good if I do the salt crust portion the night before/the morning of?
I.e., 30 mins in air fryer at 250 and then take out and put back in the fridge for a few hours/up to overnight.
Aiming to minimize time to serve it freshly prepared on the day
Hi Anthony – I haven’t tested it this way so I can’t say for sure, but I wouldn’t suggest doing it this way. The pork belly and fat will be starting from a cold state, so there’s a chance it may not crisp up the skin properly. If you do end up trying it, please let me know how it goes!
Got it – thank you! Ended up just making it following the recipe as is and it turned out great
I’m so glad it worked out and you enjoyed it!
Your regular recipe says to dry out the skin the fridge before baking. Why not do that in this recipe?
Hi Jo – I’ve found that this step is not needed in an air fryer vs a regular bake. I hope you enjoy it!
Thanks again for this recipe. I’ve made it perhaps eight times now. It’s addictive.
Here are a few suggestions if you are trying this for the first time. My Ninja Foodie won’t air fry at 250F. 300F is the lowest setting so I do the first part at 300 for 23 or so minutes. I was tempted to rub more of the seasoning mix in because it didn’t seem like enough but it is. Keeps the flavor great but just subtle enough to not be overwhelming. If I could give this recipe more than 5 stars I would. Awesome
These are great tips – thank you Don!
So easy and absolutely delicious. Will make this again for sure!