The Ultimate Creamy Baked Mac and Cheese (VIDEO)
This post may contain affiliate links. Please read our disclosure policy.
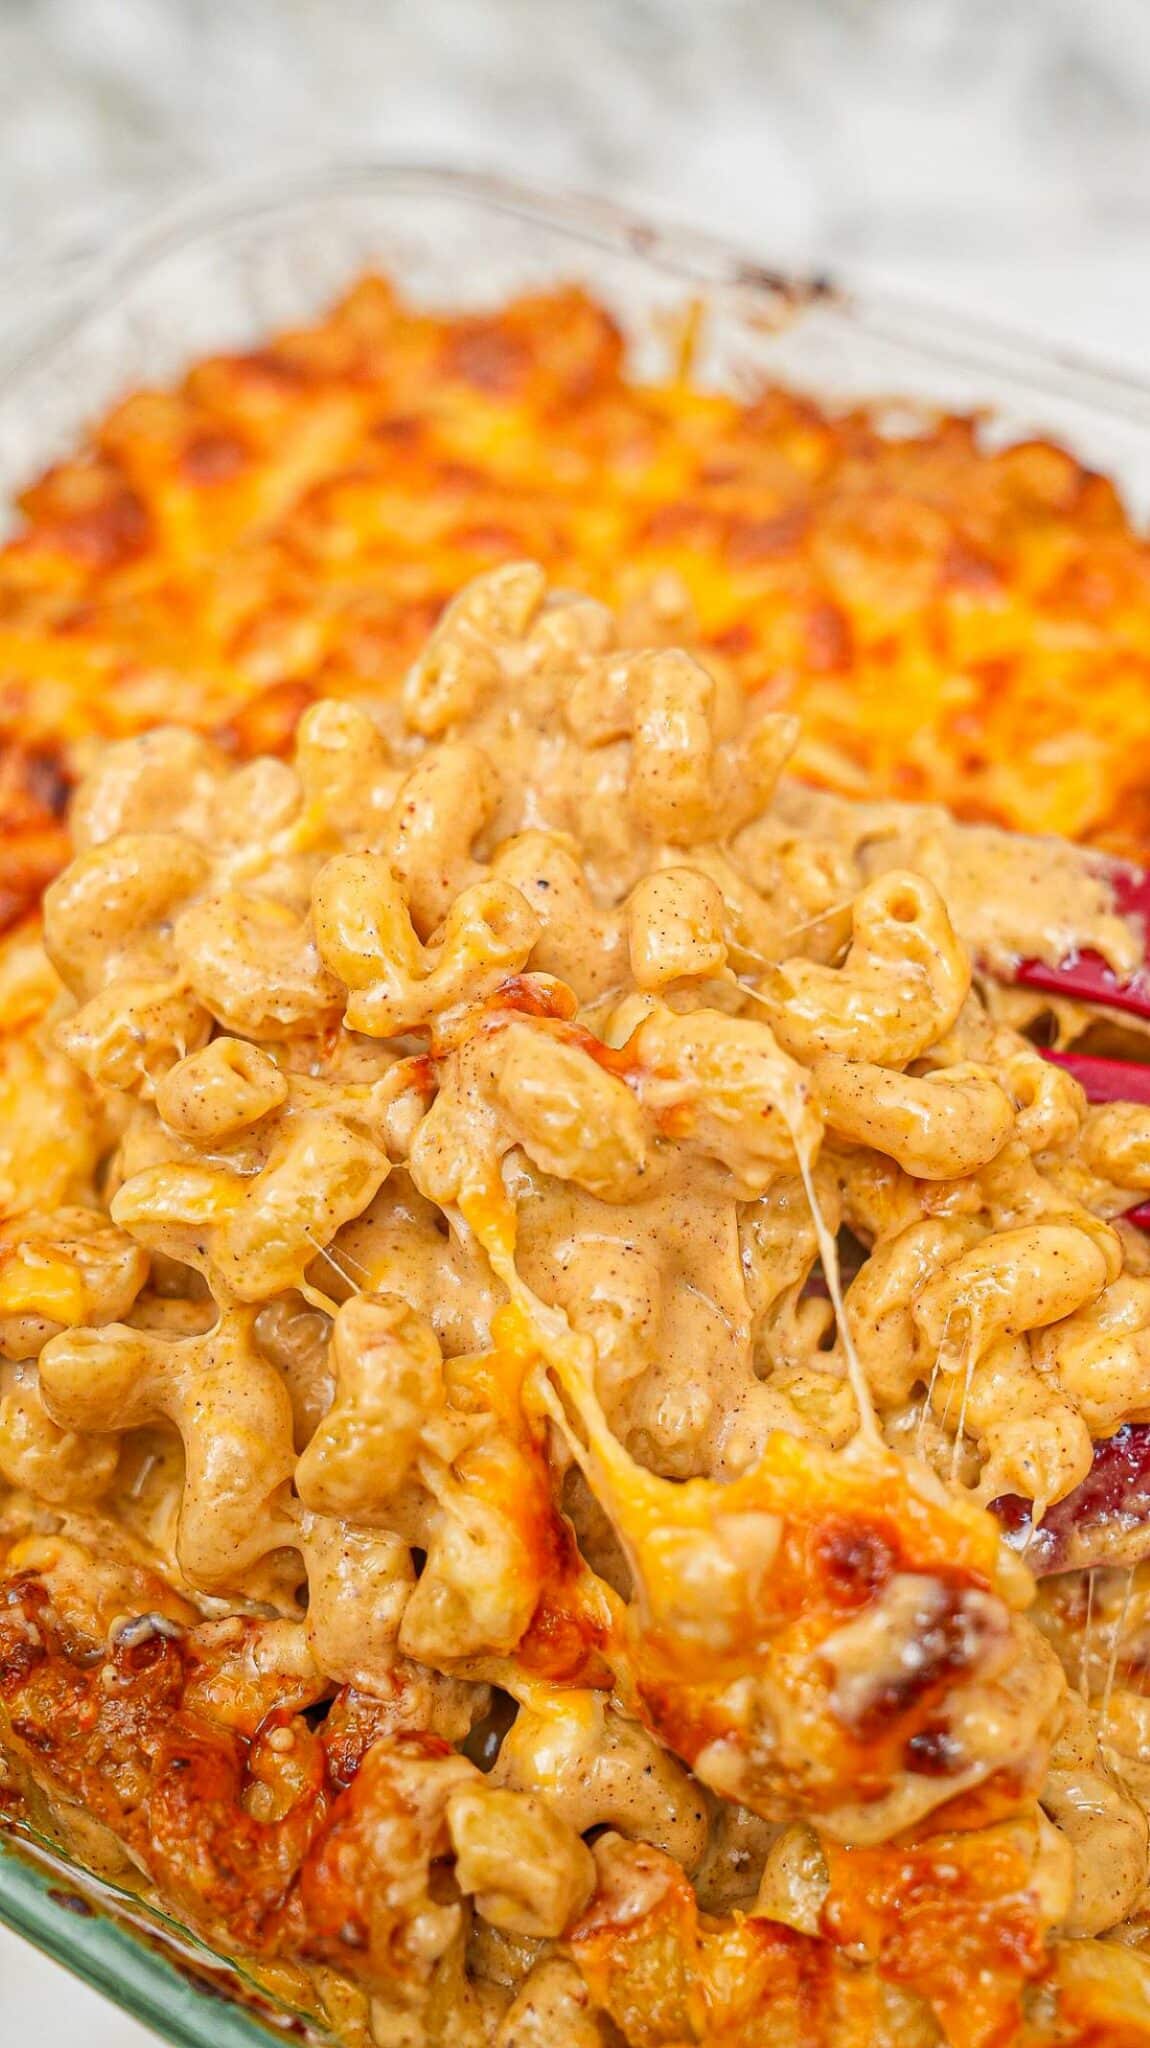
This creamy, rich Creamy Baked Mac and Cheese uses three types of cheese and my secret ingredient that will make this the most luxurious, over-the-top Macaroni and Cheese you’ve ever had!
Watch the Creamy Baked Mac and Cheese Recipe Video!
A Note from CJ

This is the ultimate Baked Mac and Cheese!
This is a showstopper recipe – it’s rich, ooey, gooey, and so creamy, with three kinds of cheeses! It takes a little bit of effort but well worth it! If you’re looking for a Baked Mac and Cheese with a crispy panko topping, try my Crispy Baked Mac and Cheese instead.
Because this Mac and Cheese is so rich, I like to balance it with a vegetable side like Roasted Brussels Sprouts (or Air Fryer Brussels Sprouts), Air Fryer Broccoli, Roasted Cauliflower, Crispy Smashed Potatoes, Honey Glazed Carrots, and Roasted Green Beans with Bacon!
Ingredient Tips
Refer to the recipe card for the full list of ingredients and measurements!
- cavatappi pasta – I use cavatappi, but you can also try medium shells, corkscrew, or elbow macaroni.
- gruyere cheese, colby jack cheese, sharp cheddar cheese – make sure to grate your own cheese for best results!
- ground mustard – this is a dry mustard in powder form; you can also substitute for 1 tablespoon of dijon mustard
- unsalted butter – make use to use unsalted butter, as the 3 cheeses have enough salt in them.
- evaporated milk – Evaporated milk is my secret ingredient! It has 60% less liquid than regular milk, making it creamier and thicker with all of the milky, dairy flavor without the water.
- freshly grated nutmeg – freshly ground nutmeg adds a vibrance and depth of flavor that warms up any creamy, savory dishes.
How to Make the Ultimate Creamy Baked Mac and Cheese
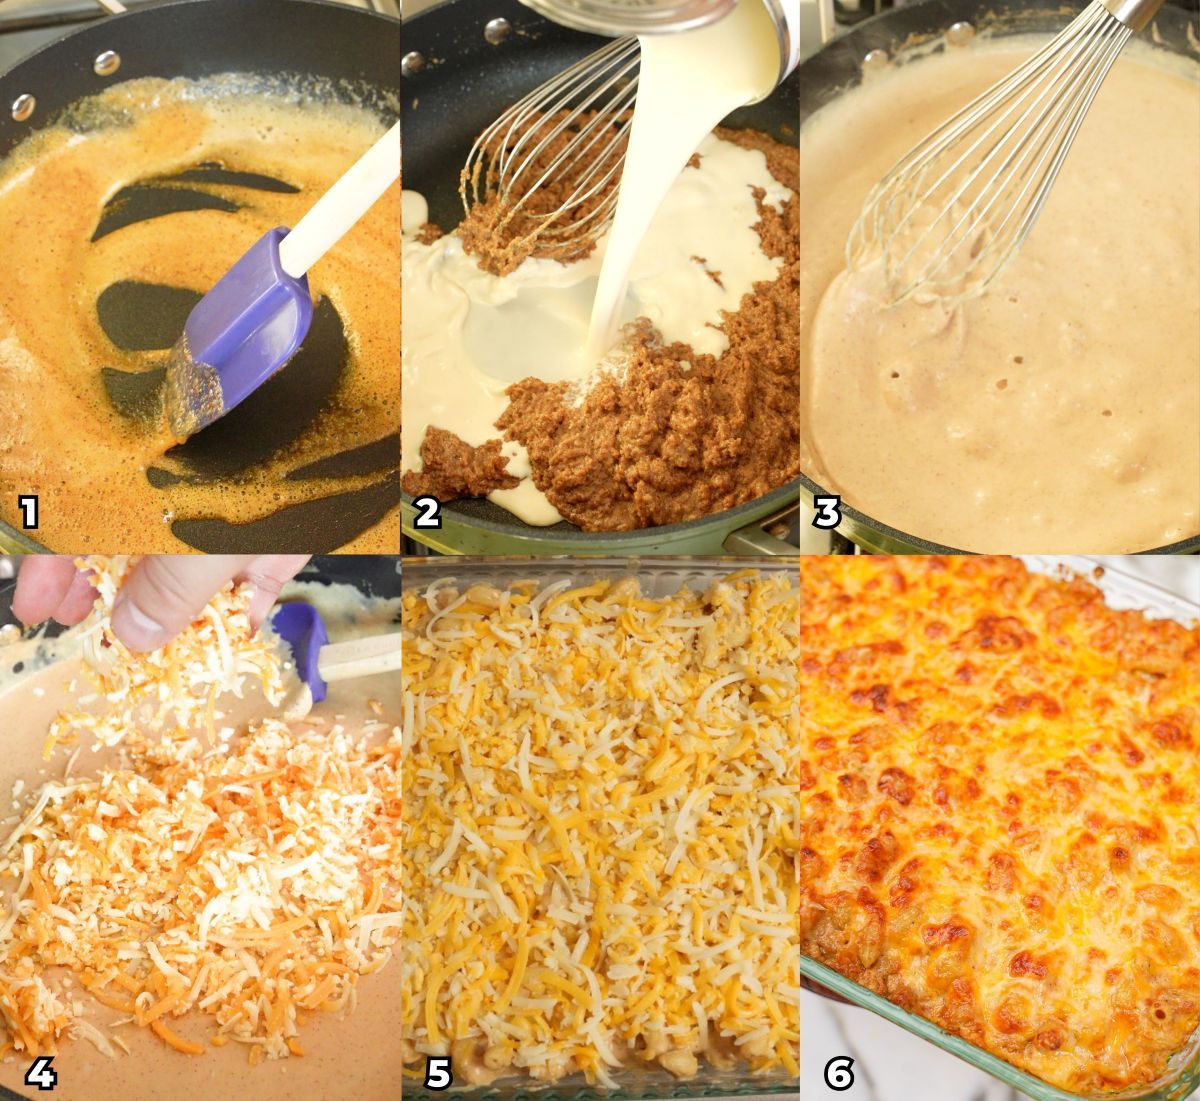
Cook the Pasta and Begin the Cheese Sauce – Cook the pasta until just shy of al dente—about 3 minutes less than package directions—so it stays perfectly tender after baking. While the water heats and the pasta cooks, shred the gruyere, colby jack, and sharp cheddar to ensure a smooth melt, then mix and divide the cheese into two even portions. Combine the black pepper, garlic powder, smoked paprika, cayenne, and ground mustard in a small bowl so your seasoning mix is ready to go. Melt butter in a large pan over medium heat, bloom the spices for 30 seconds, then whisk in the flour to form a light golden roux. Slowly pour in the evaporated milk followed by the heavy cream, whisking constantly until the sauce simmers and thickens without lumps.
Layer the Mac and Cheese and Bake – Turn off the heat and stir in half of the shredded cheese, adding it gradually so the sauce stays silky and smooth, then grate in fresh nutmeg. Fold in the drained pasta until every piece is coated in the rich cheese sauce. To assemble, layer half the mac and cheese in a 9×13 baking dish, top with half of the remaining cheese, then repeat with the rest of the pasta and cheese. Bake at 350°F for 25–30 minutes until the top is melted and bubbling, then broil for 3–5 minutes for that signature crispy cheese crust. Let the creamy baked mac and cheese cool for 15 minutes before serving to set the texture. Enjoy!
PRO TIPS
CJ’s Recipe & Storage Tips
Undercook the pasta – Undercook the pasta by 3 minutes less than the package instructions to avoid the pasta being overcooked after baking.
Turn the heat off before adding the cheese – Turn the heat off BEFORE adding the cheese – if the roux is too hot, the fats and proteins in the cheese can break apart, leading to curdling and graininess.
Storage and Reheating – Store any leftovers in an airtight container in the refrigerator for up to 3-4 days. The pasta will soften and the overall dish will have a little bit less texture/creaminess. I like to reheat leftovers in the microwave – it’s super easy and quick.
I personally would not make this ahead of time – however, if you need to, I would assemble the layers in step #8, wrap tightly with saran wrap, and store in the refrigerator until the day of serving (max 2-3 days). On the day of, I would continue step #9 and bake.
If you tried this Creamy Baked Mac and Cheese Recipe or any other recipe on my website, please leave a 🌟 star rating and let me know how it went in the comments below!
Creamy Baked Mac and Cheese (VIDEO)

Video
Equipment
- Box Grater for grating cheese
- Food Processor for grating cheese…FAST!
Ingredients
- 1 lb cavatappi pasta, can sub medium shells, corkscrew, or elbow macaroni
- 1 tablespoon kosher salt
- 1 lb gruyere cheese
- 1 lb colby jack cheese
- 1/2 lb sharp cheddar cheese
- 1/2 tsp freshly ground black pepper
- 1 tsp garlic powder
- 1/2 tsp smoked paprika
- 1/4 tsp cayenne pepper
- 1 tsp ground mustard, can sub 1 tbsp of dijon mustard
- 4 tbsp unsalted butter
- 3 tbsp all purpose flour
- 1 12 oz can evaporated milk
- 2 cups heavy cream
- 1/2 tsp freshly grated nutmeg
Instructions
- Preheat the oven to 350°F. Bring a large pot (about 3 quarts) of water to a boil over high heat and add the kosher salt. Cook the pasta 3 minutes less than the package directions. Drain the cooked pasta and set aside.
- Shred the gruyere, colby jack, and sharp cheddar cheese using the course shred side box grater or food processor attachment. Once the cheese is grated, mix all the cheese together in a large bowl, then divide into two even portions and set aside.
- In a small bowl, add the black pepper, garlic powder, smoked paprika, cayenne pepper, and ground mustard. Mix until combined and set it aside.
- In a large pan, melt the butter over medium heat. When melted, add the seasoning mix. Cook for 30 seconds until the spices are fragrant. Add the flour and cook, stirring constantly, until everything bubbles slightly and looks incorporated, about 2-3 minutes. The color should be light to medium brown.
- Slowly add in the evaporated milk while whisking to ensure there are no lumps. Next, slowly add the heavy cream whisking constantly to fully incorporate it into the sauce. Let the sauce come to a simmer and cook for 2 minutes until slightly thickened, continuing to whisk to ensure there are no lumps.
- Turn off the heat, then add half of the cheese a few handfuls at a time, ensuring the cheese melts before adding more. Grate in the fresh nutmeg and stir to combine. Stir in the drained pasta until the pasta is thoroughly incorporated with the cheese sauce.
- Take a 9×13 inch baking dish and add 1/2 of the mac and cheese to the bottom of the dish, spreading evenly. Layer on 1/2 of the remaining cheese then the remaining mac and cheese. Finish by evenly layering on the last of the shredded cheese.
- Bake in the preheated oven for 25-30 minutes or until the top melts and bubbles. Broil for 3-5 minutes to crisp up the cheese topping as desired. Let cool for 15 minutes before serving and enjoy!
Notes
Nutrition
Nutrition information is automatically calculated, so should only be used as an approximation.
This Creamy Baked Mac and Cheese recipe was originally published in November 2024, and updated in November 2025.


still trying to find what the salt is for. i’ve read the instructions repeatedly. what am i missing?
Hi Mars – the salt is to season the pasta water when boiling (step 1). Hope that helps!
This was delicious, cant wait to make for thanksgiving!
Thanks so much Sabrina! Happy Thanksgiving!