Korean Corn Cheese – So Easy! (VIDEO)
This post may contain affiliate links. Please read our disclosure policy.
Creamy, cheesy Korean Corn Cheese is my favorite side dish when I go to Korean Barbecue! You’re going to love how easy it is to recreate this favorite at home!

Watch the Korean Corn Cheese Recipe Video Below!
A Note from CJ
Korean Corn Cheese and more for KBBQ night at home!

Are you planning on having a Korean Barbecue night at home? Aside from Korean Corn Cheese, I have all of the recipes you’ll need!
Start with everyone’s favorite Korean Marinated Short Ribs (LA Galbi), Beef Bulgogi or Spicy Pork Bulgogi! You’ll need a plethora of side dishes (banchan) like Korean Spinach Side Dish, Korean Bean Sprout Side Dish, Korean Broccoli Salad, Korean Cucumber Salad, Korean Braised Potatoes, Korean Stir Fried Fish Cakes, Korean Braised Tofu, and Korean Egg Roll! Finish it with Kimchi Fried Rice and you have the perfect KBBQ night at home!
Ingredient Tips
Refer to the recipe card for the full list of ingredients and measurements!
- corn, canned or fresh – I personally use canned for convenience but you can also use fresh corn.
- butter – make sure to use unsalted butter. You can always add more salt if the dish needs it.
- mayo – I love using Kewpie (Japanese mayo) – Kewpie mayo is used with only egg yolks, so it is richer and creamier than conventional mayo. You can use whatever mayo you prefer or have on hand.
How to Make Korean Corn Cheese
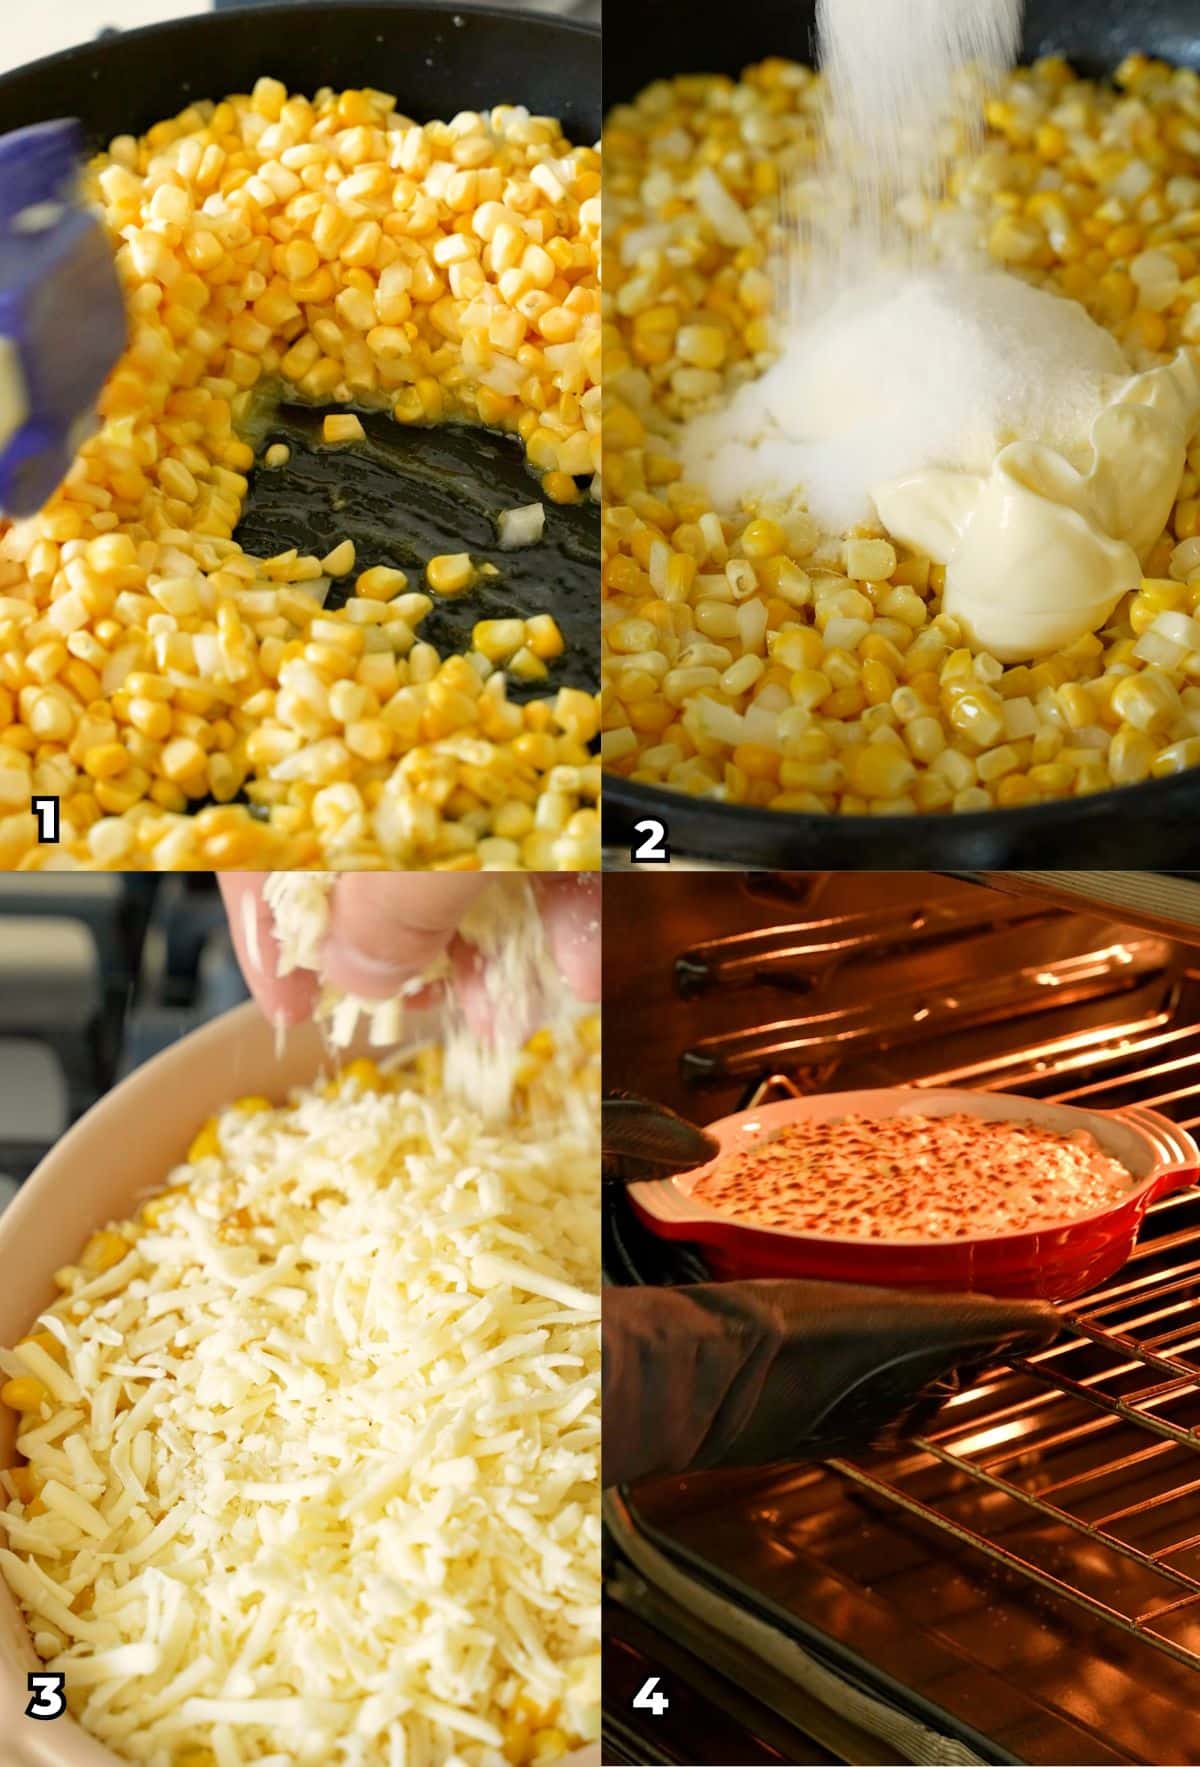
Remove water from the corn and onions – If using fresh corn, cut kernels off the cob and combine with diced onions in a small bowl. If using canned corn, rinse and drain before mixing with onions. Add the salt and let sit for 30 minutes, then drain any excess water that collects at the bottom.
Make the Korean Corn Cheese – Melt butter in a pan over medium high heat and add corn and onions and sauté about 5-6 min. Remove from the heat. Add mayo and sugar to corn/onions and mix to combine. Place the mixture into an oven safe dish and top with shredded mozarella cheese. Broil for 2-3 minutes until the cheese has melted and enjoy!
PRO TIPS
CJ’s Tips / Storage, Make Ahead, Reheating Tips
Remove as Much Moisture From the Corn – Whether you are using canned or fresh corn, you will need to remove as much moisture as possible from the corn before broiling – otherwise, you’ll end up with a soggy dish. The way to combat excess moisture is by salting the corn for 30 minutes before cooking – this extra step is key!
Storage, Make Ahead, Reheating Tips – Korean Corn Cheese can be stored in an airtight container in the refrigerator for up to 3 days. I usually microwave it to quickly reheat before eating.
If you want to prepare his dish in advance, cook the corn and onions and mix with mayo, sugar, and top with mozzarella cheese. Cover with saran wrap and store in the refrigerator for up to 3 days. Pull out of the refrigerator and pop into the oven to broil for 2-3 minutes before serving.
If you tried this Korean Cheese Corn or any other recipe on my website, please leave a 🌟 star rating and let me know how it went in the comments below!
Korean Corn Cheese (AUTHENTIC!)

Video
Ingredients
Instructions
- In a large bowl, rinse the corn and drain. Add the salt, onion, and mix together and let sit for 30 mintues. Drain the excess water that has pooled to the bottom. Do the same process if using canned corn.
- Melt butter in a pan over medium high heat and add corn and onions and sauté 5-6 min until the corn and onions have softened. Turn off the heat, then add mayo and sugar to the pan and mix to combine.
- In an oven safe dish, add the corn mixture and spread evenly in the dish. Top with shredded mozzarella cheese.
- Broil for 2-3 minutes or until cheese is golden and bubbly. Enjoy!
Notes
Nutrition
Nutrition information is automatically calculated, so should only be used as an approximation.


This was great! Though, admittedly I did change it based on need and available ingredients.
As a base for a recipe though, this was solid, and I will go back to it!
I only had Duke’s Mayo, so I decided to make this a more savory dish, using plenty of salt, and sauteing with garlic and pepper.
I also added some horseradish to the Mayo, and then used cheddar and Brie because I didn’t have mozzarella.
It was a crowd pleaser!
I feel a little bad deviating from your recipe, but, thank you for the idea. I will make it again!
I’m so glad you liked it, Chip! Thanks for leaving a great review.
Could you use green onions instead of regular onion?
Hi Kathy – I would use the white parts only of the green onions if you want to substitute the onions.
So easy to make! I love that I can make this anytime I want now without having to go to KBBQ!
@michelle_quay
So easy to make! I love that I can make this anytime I want now without having to go to KBBQ!
Love corn cheese!
This is the must bring party dip! Every time I make it, people love it!
Been seeing these in kdrama and IG. Easy steps and easy ingredients and can’t go wrong with canned corn. Best combo! @the.jojo.h
Great recipe and really usefull tips!
Hosted and made kbbq at home one day and this corn was a hit. I broiled and served it on mini cast iron skillets (the ones you find during Christmas with cookie dough)